
How to Convert a Blackstone Griddle to Natural Gas (Step-by-Step)
What changed: Updated to Blackstone's current 5395 kit and added the models that can't be converted and the gas pressure the kit needs.
Most Blackstone griddles can run on natural gas with Blackstone’s conversion kit: you swap the propane orifices for natural gas ones and replace the regulator with a natural gas hose. For a standard or Omnivore griddle the kit is model 5395 (the version with wind guards). Culinary series griddles, propane air fryer models, and a handful of specific model numbers are the exceptions, so check yours first.
If you already have a gas line outside, it’s worth doing: no more tank swaps or running out halfway through a cook, and natural gas usually costs less than propane.
Which Kit Do You Need?
Blackstone sells two natural gas kits, and older articles and Amazon listings still point regular griddles to the wrong one.
| Kit | Fits |
|---|---|
| 5395 Natural Gas Conversion Kit with Wind Guards | Standard and Omnivore style griddles: most 28”, 30”, and 36” griddles and Tailgater units |
| 5249 Natural Gas Conversion Kit | Blackstone drop-in outdoor kitchen units |
That split comes from Blackstone’s own product page for the kit. If you have a regular freestanding griddle, buy the 5395.
Which Blackstone Griddles Can’t Be Converted
Per Blackstone, don’t use the 5395 kit on:
- Propane air fryer griddles. Blackstone says not to convert these to natural gas at all.
- Model numbers 1868, 1902, 1916, 1923, 2022, and 6825. Blackstone lists these as not compatible with the kit.
- Culinary and Culinary Pro griddles. Blackstone calls these “not optimized” for conversion, and the orifice wrench in the kit doesn’t fit Culinary Collection valves, so you’d need to source a different wrench.
The kit is listed for 28”, 30”, and 36” griddles and Tailgater units. Smaller griddles like the 22” and 17” tabletops aren’t on that list.
Your model number is on the label on the griddle body. Match it against the lists above before you buy anything.
What You Need
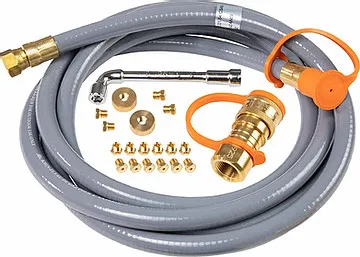
Blackstone Natural Gas Conversion Kit with Wind Guards (5395): it includes:
- 10-foot natural gas hose with a ⅜” quick-connect fitting
- Natural gas orifices in both thread sizes (M6 x .75 and M6 x 1.0)
- Two thread check gauges
- 7mm orifice wrench
- Steel wind guards
Also needed (not in the kit):
- Thread sealant rated for natural gas
- Phillips-head screwdriver
- Adjustable wrench
- Soapy water in a spray bottle or with a brush, for the leak test
Check two things about your gas supply before you start:
- Pressure. The kit is built for natural gas at 7 inches of water column at the griddle’s inlet. Blackstone recommends having a natural gas professional confirm your line is regulated to that pressure.
- Fitting size. The quick-connect is ⅜”. Many home gas outlets are ½”, in which case you need a ½” to ⅜” reducer.
How to Convert a Blackstone Griddle to Natural Gas
Step 1: Prepare the Griddle
Make sure the griddle is completely cool. Turn all control knobs to off and close the propane tank valve.
Disconnect and remove the propane tank. Store it outdoors, upright, away from any heat source. Never store propane inside or in a vehicle.
Lift the griddle top off the frame and set it aside. If your igniter wires run to each burner, note which wire goes where before you unplug them; they’re different lengths and need to go back the same way. Use the Phillips-head screwdriver to remove the screws holding the burner tubes, then pull the tubes free from the valves. (On combo units you may also need the adjustable wrench for nuts.)
Step 2: Swap the Orifices
The orifices are the small brass fittings screwed into the back of each gas valve. Natural gas runs at a lower pressure than propane, so natural gas orifices have larger openings; that’s the whole point of the swap.
Use the 7mm orifice wrench from the kit to unscrew the propane orifices from each valve. Keep them in a bag with the regulator in case you ever convert back.
Before installing the new orifices, use the thread check gauges to confirm each valve’s thread size, either M6 x .75 or M6 x 1.0, and match the natural gas orifice to it.
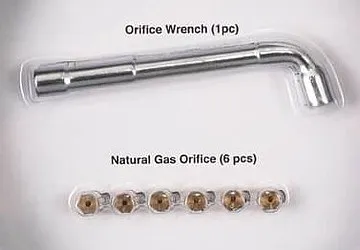
Put a thin layer of gas-rated thread sealant on each new orifice’s threads. Start each one by hand, then snug it with the wrench. Do not overtighten. Blackstone specifically warns to be gentle here, because it’s easy to strip the threads in the valves, and an orifice that snaps off in a valve is a much bigger job.
Step 3: Reassemble the Griddle
Slide each burner tube back over its valve and screw it in. Reconnect the igniter wires the way they came off. Set the griddle top back on the frame, and fit the wind guards from the kit.
Step 4: Connect the Natural Gas Supply
Remove the propane regulator and hose from the griddle with the adjustable wrench. Store it with the propane orifices.
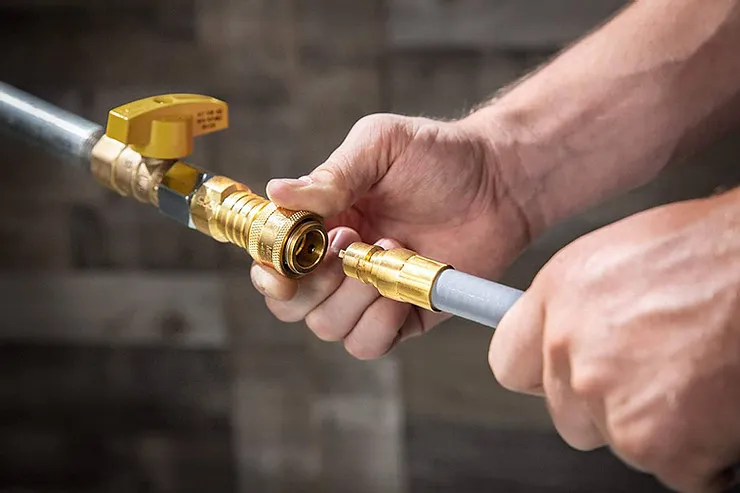
Thread the quick-connect fitting onto your home’s natural gas outlet using gas-rated sealant (with the reducer if you need one), and tighten it with the adjustable wrench.
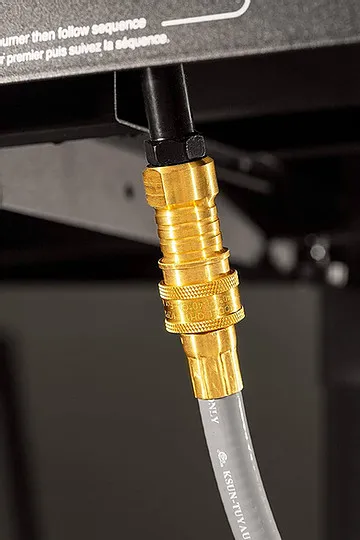
Attach the natural gas hose to the griddle, hand-tight first, then snug with the wrench. Connect the other end to the quick-connect: clear any debris from the fitting, press the connector firmly into the collar, and give it a pull to make sure it’s locked.
Leak test before the first cook. Turn on the gas supply and brush or spray soapy water over every connection: the quick-connect, both hose ends, and each orifice. Bubbles mean a leak. If you see any, shut the gas off and re-seat or tighten that connection before going any further.
No bubbles? Light it the same way you always have.
Note: Blackstone recommends having a natural gas professional check that your line is regulated to 7 inches of water column. If you’re not comfortable working on gas connections, have a pro handle step 4. The orifice swap in steps 1-3 is ordinary DIY work; the hookup to your house line deserves more caution.
After the Conversion
Natural gas comes from the line at a steady pressure, so you won’t see the slow fade a propane tank gives you as it empties. The flames may look a little different from what you’re used to on propane. Mostly blue flames with crisp cones are what you want; if they run yellow or lift off the burner, the flame problems guide walks through what each one means, and a weak flame across every burner usually points back to the line pressure.
Keep the propane orifices and regulator somewhere safe. Converting back is these same steps in reverse.
Now that the griddle is on a fixed gas line, the leak-check habit applies to that connection too. The outdoor griddle safety guide covers it.
Now cook without limits: Smash Burgers · Blackstone Steak · Fried Rice · Chicken Fajitas
Frequently Asked Questions
Which Blackstone griddles can be converted to natural gas?
Most standard and Omnivore style 28”, 30”, and 36” griddles and Tailgater units, using Blackstone’s 5395 kit. Propane air fryer griddles shouldn’t be converted, Culinary and Culinary Pro griddles aren’t optimized for it, and Blackstone lists models 1868, 1902, 1916, 1923, 2022, and 6825 as not compatible. Smaller griddles like the 22” and 17” aren’t on the kit’s list.
Which Blackstone natural gas kit do I need, 5395 or 5249?
The 5395 (the kit with wind guards) for standard and Omnivore style griddles. Blackstone says the 5249 is the kit for its drop-in outdoor kitchen units. Older articles and listings often point to the 5249 for regular griddles, so double-check the model number before you buy.
Do I need a professional to convert my Blackstone to natural gas?
Not for the orifice swap; that’s screwdriver-and-wrench work. Blackstone does recommend having a natural gas professional confirm your gas line is regulated to 7 inches of water column, and if you aren’t comfortable with gas connections, have a pro make the hookup to your house line.
Is natural gas better than propane for a Blackstone griddle?
For a griddle that stays in one spot, yes. Natural gas usually costs less, the pressure stays steady instead of fading as a tank empties, and you never run out mid-cook. The trade-off is that you’re tied to the gas line, so the griddle can’t go camping or tailgating anymore.
Can I convert back to propane after converting to natural gas?
Yes. Keep the propane orifices and regulator from steps 2 and 4, then reverse the process.
What’s the difference between natural gas and propane orifices?
Natural gas is delivered at a lower pressure than propane, so natural gas orifices have larger openings to let enough gas through for the same heat. Using the wrong orifices gives you the wrong flame: propane orifices on natural gas give weak burners, and natural gas orifices on propane give an oversized, unsafe flame.
How long does the Blackstone natural gas conversion take?
Plan on 30-45 minutes the first time. The orifice swap itself goes quickly once the burner tubes are out; the gas line hookup depends on your setup.
What Not to Cook on a Blackstone (and What to Do Instead)
What doesn't work on a Blackstone griddle: low-and-slow cuts, big roasts, anything that sits in liquid, and deep-fried food, plus how to split the cook so the griddle still does the part it's good at.
Griddle vs Grill: Which Should You Get?
Griddle vs grill: the real differences, which is healthier, whether a griddle is worth it if you already own a grill, and which wins for steaks and burgers.
Why Is Everyone Selling Their Blackstone? An Honest Answer
Why is everyone selling their Blackstone? Mostly, they aren't. Here's the honest story, plus the real cons, lifespan, the Walmart price, and if it's worth it.