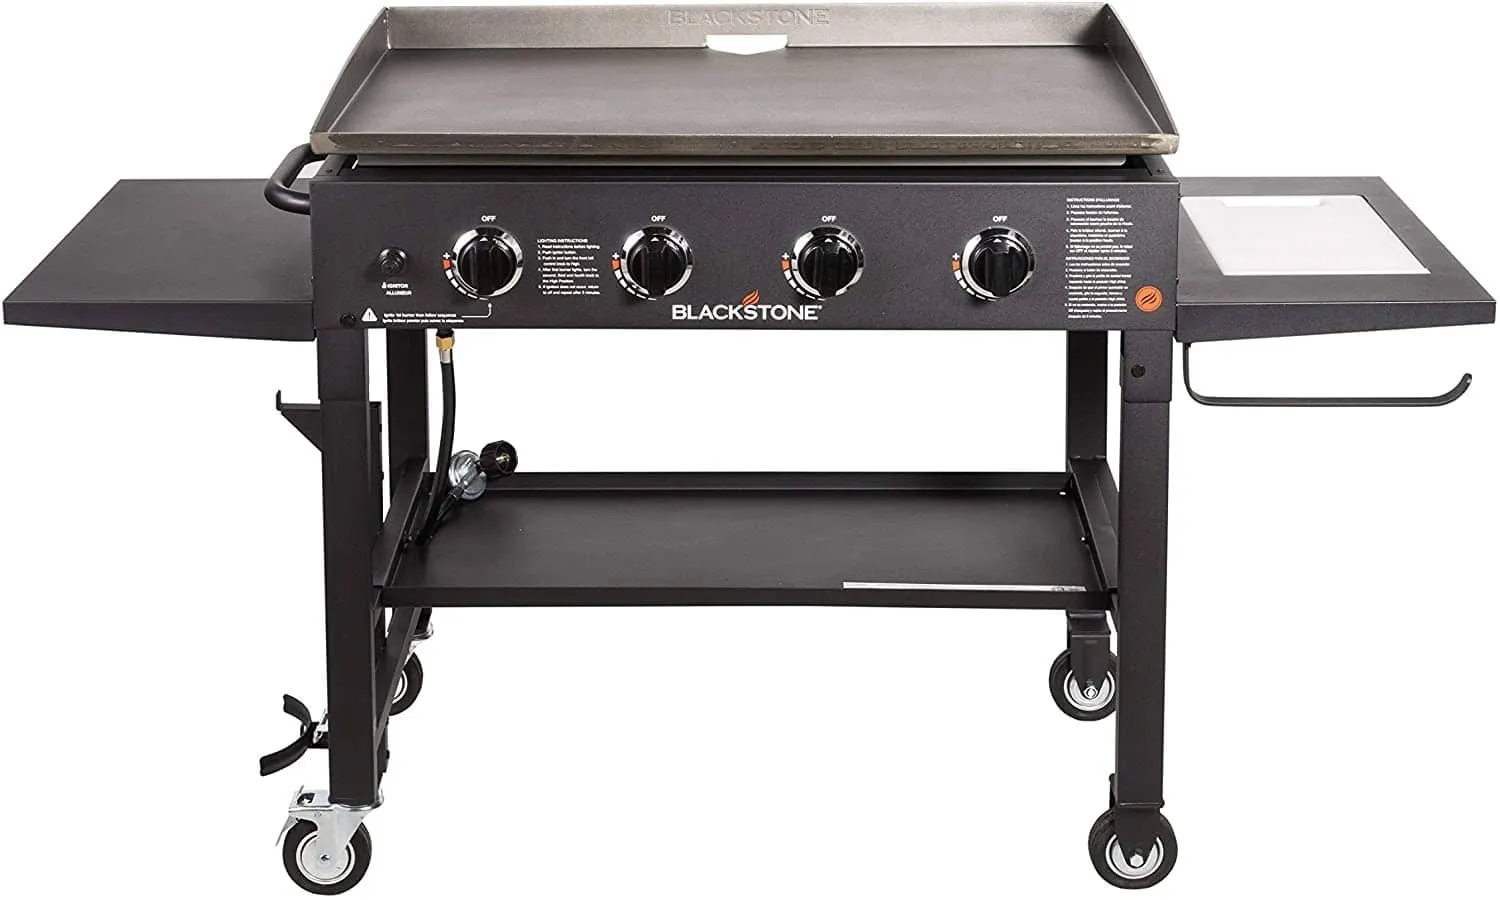
How to Season a Blackstone Griddle (Step-by-Step)
Seasoning is the single most important thing you’ll do to your Blackstone — before the first cook and after every cook that follows. A properly seasoned griddle is naturally non-stick, rust-proof, and gets better every time you use it. Skip it or do it wrong and you’ll fight food sticking, gummy buildup, and rust the whole life of the griddle.
This guide covers everything: the science behind it, which oils to use, the step-by-step initial seasoning process, how to maintain the surface between cooks, how to re-season when things go wrong, and answers to every question people have about Blackstone seasoning.
Does a Blackstone Come Pre-Seasoned?
No. Blackstone griddles ship from the factory with a protective coating — not a food-safe seasoning. That coating exists to prevent rust during shipping and storage. Before you cook on a new Blackstone, you need to burn off that factory coating and apply your own seasoning from scratch. Skipping this step means cooking on a surface that wasn’t designed for food contact.
What You’ll Need
- Blackstone griddle
- High-smoke-point oil (see oil guide below)
- Heat-resistant gloves
- Lint-free paper towels
- Tongs (to handle paper towels safely on a hot surface)
- Metal scraper (see must-have Blackstone accessories for our picks)
- Infrared thermometer (optional but helpful)
The Best Oils for Seasoning a Blackstone Griddle
Not all oils season equally. The key variable is smoke point — the temperature at which oil breaks down and bonds to the steel through polymerization. Higher smoke point oils generally create harder, more durable seasoning layers.
| Oil | Smoke Point | Notes |
|---|---|---|
| Avocado oil | 520°F | Best all-around — highest smoke point, neutral flavor, bonds reliably |
| Blackstone Seasoning Conditioner | approx. 450°F | Purpose-built for griddles, easy to apply, great results |
| Grapeseed oil | 420°F | Light, neutral, polymerizes well |
| Canola oil | 400°F | Affordable, widely available, solid choice |
| Vegetable oil | 400°F | Fine for maintenance seasoning; adequate for initial |
| Crisco / shortening | 360°F | Works well, widely used in the Blackstone community |
| Flaxseed oil (unrefined) | 225°F | Creates a very hard layer but flakes badly if applied too thick — avoid for initial seasoning |
| Lard / bacon grease | 370°F | Great for ongoing cooking; not recommended for initial seasoning — animal fats can turn brittle and flake on a bare surface |
Best pick for initial seasoning: Avocado oil or Blackstone Seasoning & Cast Iron Conditioner. Both have smoke points well above griddle cooking temperatures, apply easily with a paper towel, and build a durable base.
Budget pick: Canola or vegetable oil. You’ll get slightly less-hard seasoning than avocado oil but the difference is minimal after a few cooks.
Avoid for initial seasoning: Olive oil (low smoke point), butter (burns, doesn’t polymerize), and cooking sprays like PAM (lecithin additives cause sticky buildup over time). See the full best oil for Blackstone griddle breakdown for cooking oil recommendations beyond seasoning.
Initial Seasoning: Step-by-Step
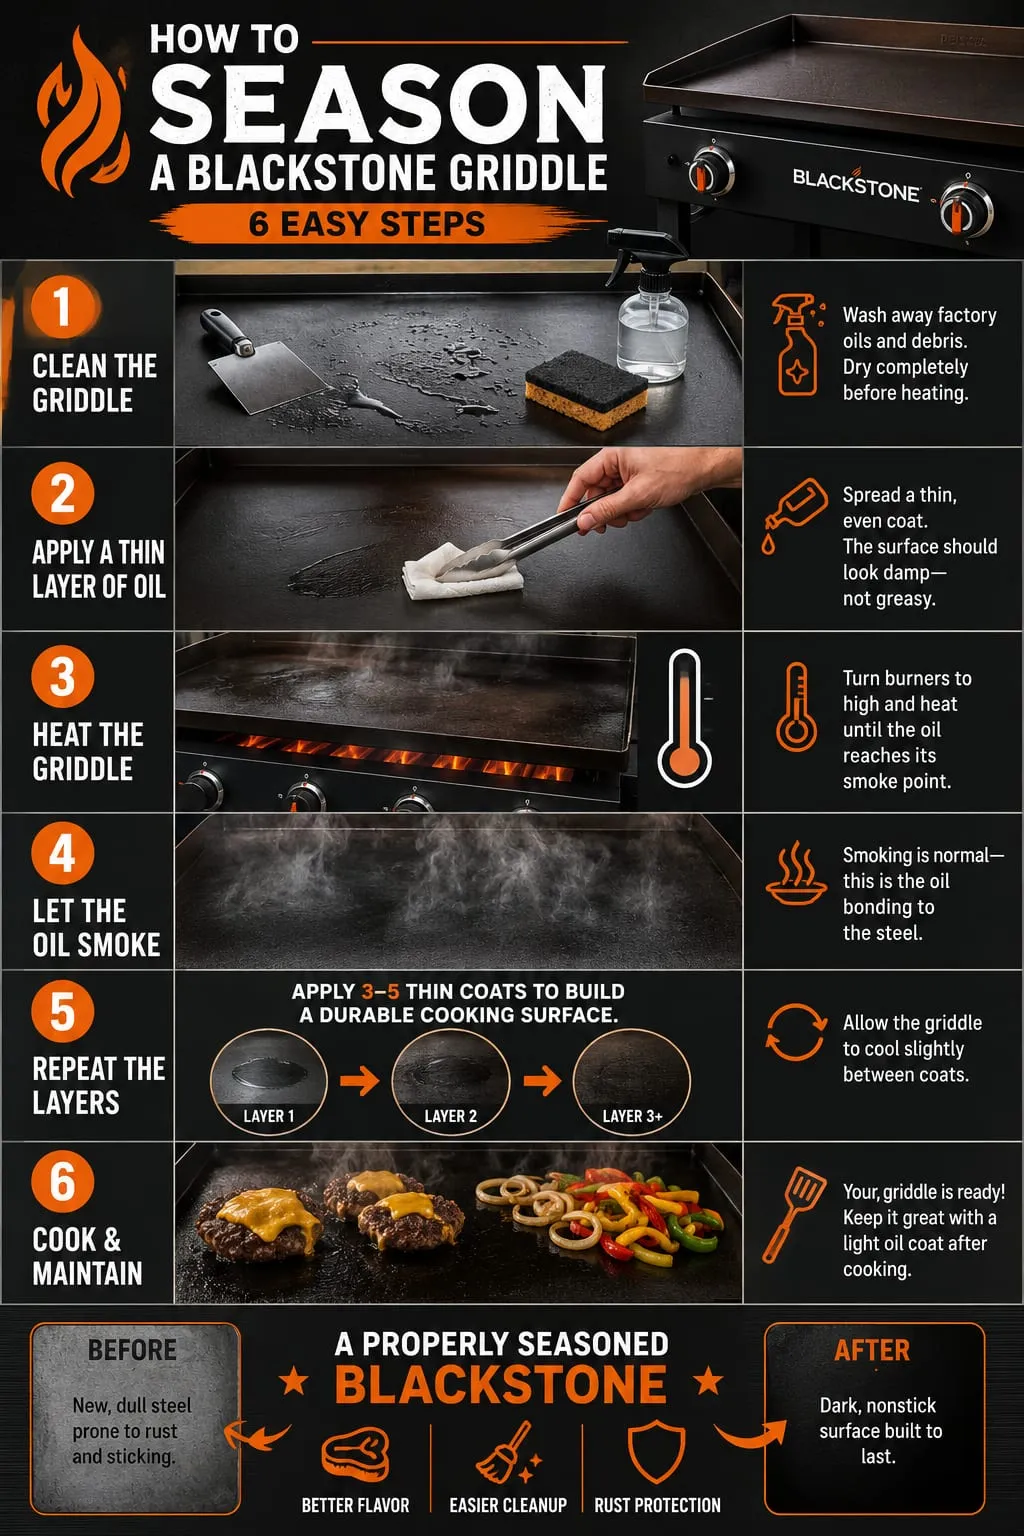
Plan for 60–90 minutes total. Do this outdoors — the process produces significant smoke. Have paper towels and tongs ready before you start.
Step 1: Clean Off the Factory Coating
Wash the griddle surface with warm soapy water and a non-abrasive sponge. Rinse thoroughly. Dry completely with paper towels, then turn all burners to low for 5 minutes to evaporate any remaining moisture. The surface should be completely dry before heat goes on.
This is the only time you’ll ever use soap on the griddle surface.
Step 2: Heat Until the Surface Changes Color
Turn all burners to high and let the griddle heat for 10–15 minutes. Watch what happens: the surface will shift from silver-gray to tan to brown to dark in patches. This is the factory coating burning off. Let it go until the entire surface has darkened and stopped smoking actively. Turn the burners off and let it cool for 5 minutes.
Step 3: Apply a Thin Coat of Oil
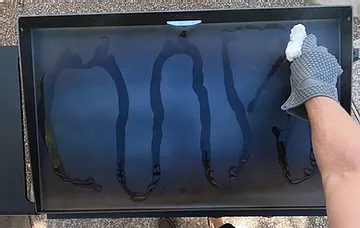
Pour a small amount of oil onto the surface — about 2–3 tablespoons for a 36” griddle, less for smaller models. Using tongs and a folded paper towel, spread it into a thin, even layer across the entire cooking surface, including the edges and corners. The surface should look barely damp. If you can see pooling or wet spots, you used too much.
Thin is the entire game. One heavy coat does less than three light ones. Too much oil in a single pass creates a sticky, gummy layer that never fully hardens.
Step 4: Heat Until the Smoking Stops
Turn all burners back to high. The oil will begin to smoke within a few minutes as it polymerizes — this is exactly what you want. The surface will darken further. Let it smoke until it stops on its own, usually 15–20 minutes. Don’t rush this step.
Step 5: Repeat 3–4 Times
Let the griddle cool for 5 minutes, then repeat steps 3–4. Do 3–4 complete cycles for the initial seasoning. With each coat the surface gets progressively darker and more uniform. After the final coat it should be a dark brown to black with a slight sheen — not shiny like a mirror, but not dull either.
You can cook on it after this. The seasoning will continue to build and improve with every subsequent cook, especially anything fatty.
Do You Season the Sides?
Yes — apply oil to the sides and edges of the griddle top during each coat. Food grease and moisture will reach those areas during cooking. Leaving them bare means rust can start at the edges and work inward.
After Every Cook: Maintenance Routine
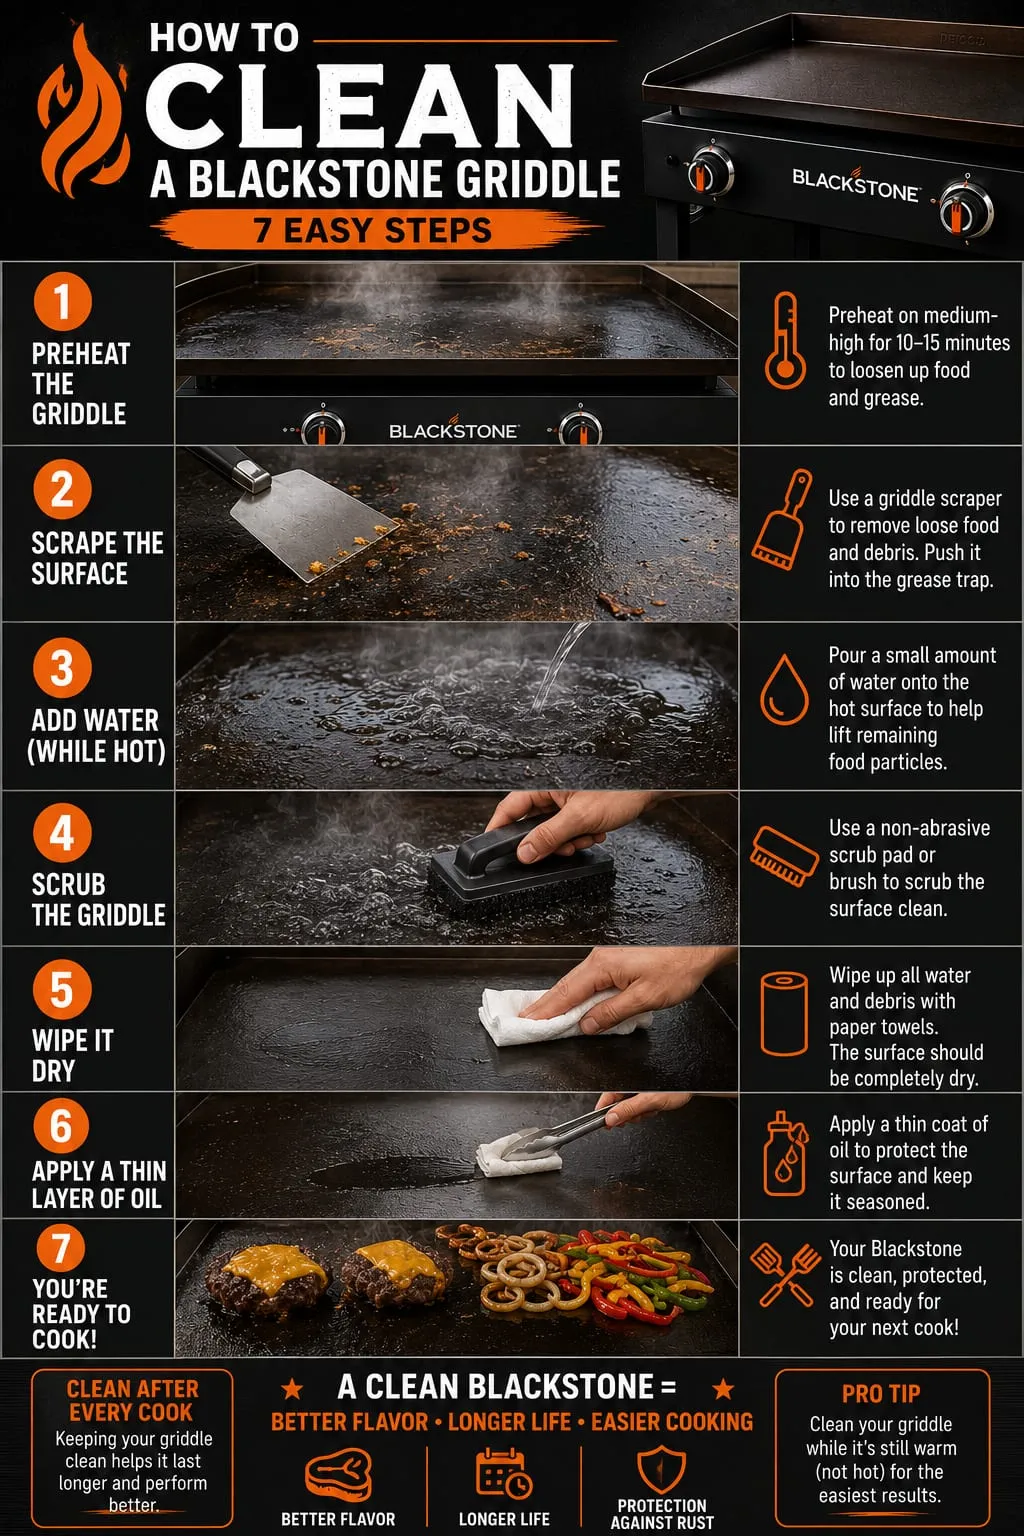
This is where most people fall short. The post-cook routine is what keeps your seasoning building over time rather than degrading.
- While the griddle is still hot, scrape off all food debris with a metal scraper, pushing it into the grease trap.
- Add a small amount of water to loosen any stuck bits — it will steam off quickly. Scrape again.
- Wipe the surface with paper towels using tongs to remove remaining debris and grease.
- Apply a light coat of oil while the surface is still warm. Use a paper towel and tongs to spread it thin across the whole surface.
- Let it cool completely before covering or storing.
The oil you apply at the end of each cook is your maintenance layer. It protects the surface from moisture and oxygen until next time, and gradually adds to your seasoning with each cycle.
Never use soap during routine cleaning. It strips the seasoning layer. Soap is only for the initial factory coating removal — never again after that. For the full after-cook cleaning process including grease trap maintenance and deep cleaning, see the Blackstone griddle cleaning guide.
How to Re-Season a Blackstone Griddle
Re-seasoning is needed when the surface shows consistent sticking, visible rust, or looks stripped and unprotected. The process is the same as initial seasoning, but you may need to do more prep work first.
When surface is just dull or lightly stripped:
- Heat the griddle to medium-high.
- Scrape thoroughly with a metal scraper.
- Wipe clean with paper towels.
- Apply 3–4 thin coats of oil using the same heat-and-smoke process as initial seasoning.
When there’s rust: Refer to the full rust removal process (scrub with oil and a griddle stone or coarse salt, scrape, repeat until rust is gone) before re-seasoning. Don’t skip this — seasoning over rust doesn’t seal it, it just hides it temporarily. See our Blackstone rust removal guide.
When there’s sticky or gummy buildup: Heat the griddle to medium-high and scrape aggressively to remove the gummy layer. Wipe clean. Then re-season with thinner coats than you used before — gumminess is always caused by too much oil in a single pass.
Troubleshooting Common Seasoning Problems
Food Is Sticking
Cause: Insufficient seasoning, griddle not hot enough before adding food, or cooking low-fat foods on a newer seasoning.
Fix: Preheat the griddle fully before cooking (10–15 minutes). Apply 2–3 fresh seasoning coats. Cook fatty foods like bacon across the surface — the rendered fat adds to and reinforces the seasoning. Check the griddle temperature guide for correct temps by food type.
Sticky or Gummy Surface
Cause: Too much oil applied in a single coat, or oil that didn’t fully polymerize because the heat wasn’t high enough or long enough.
Fix: Heat to medium-high. Scrape the gummy layer off aggressively with a metal scraper. Wipe completely clean. Re-season with much thinner coats — the surface should be barely damp, not wet. Let each coat smoke off completely before applying the next. For the full diagnosis of sticky and flaking surfaces, see the sticky seasoning troubleshooting guide.
Flaking Seasoning
Cause: Oil applied too thick, building up a layer that didn’t fully bond. Also common when using flaxseed oil without thin enough coats.
Fix: Scrape off the flaking areas thoroughly. Clean the surface. Re-season with a higher-smoke-point oil (avocado or grapeseed) in very thin layers, 3–4 complete coats. Hold off on flaxseed oil until you have an established base.
Rust Spots
Cause: Surface left without an oil coat after cooking, stored in a humid environment, or stored without a cover.
Fix: See the full rust removal guide. Scrub rust off completely, dry the surface, then immediately re-season with 3–4 coats. Going forward, never store the griddle without a light oil coat on the surface.
Uneven Color (Patchy Brown and Black)
Cause: Inconsistent oil coverage or uneven burner heat during seasoning. Extremely common on new griddles.
Fix: This is cosmetic — it doesn’t affect performance. It evens out naturally with continued cooking. To speed it up, do 1–2 additional seasoning coats and cook fatty foods (bacon, chicken thighs, smash burgers) across the patchier areas.
Surface Looks Brown Instead of Black
Cause: Not enough seasoning coats, or coats that didn’t fully polymerize.
Fix: The dark color builds up over multiple cooks. Apply 2–3 more seasoning coats using the standard process. After several cooking sessions with fatty foods, the color will deepen naturally. A lighter brown surface still works — it just needs more seasoning time.
Tips for Better Seasoning
Cook fatty foods first. Bacon, chicken thighs, and smash burgers are the best things you can cook on a new Blackstone. The rendered fat reinforces and deepens the seasoning with every cook. Avoid lean proteins and vegetables as your first several cooks.
Let the griddle preheat fully. Give it 10–15 minutes before cooking. A partially heated surface cooks unevenly and doesn’t build seasoning the same way.
Don’t rush the initial seasoning. Three thorough coats beats five rushed ones. Make sure each coat smokes off completely before applying the next.
Cover the griddle when not in use. A fitted hard cover is the best long-term rust protection. If you’re storing outdoors, a hard cover is far more effective than a soft one.
Season after every cook, every time. The thin oil coat you apply after cleaning isn’t optional — it’s what keeps your seasoning building instead of degrading.
First cook after seasoning: Smash Burgers · Blackstone Pancakes · Chicken Fajitas · Breakfast Hash
Shop Blackstone Seasoning Conditioner on Amazon Shop Squeeze Bottles on Amazon Shop Griddle Scraper on Amazon
Frequently Asked Questions
How long does it take to season a Blackstone griddle for the first time?
Plan for 60–90 minutes total. The process involves burning off the factory coating (10–15 minutes) followed by 3–4 seasoning cycles, each of which takes about 15–20 minutes for the oil to fully smoke off. Add cool-down time between coats and you’re looking at about 90 minutes from start to finish.
How many coats of seasoning does a new Blackstone need?
3–4 coats for the initial seasoning, minimum. More coats give you a more durable base, but the seasoning continues building significantly with every cook — especially fatty cooks. Don’t worry about perfecting it in session one; it gets better over time.
What is the best oil to season a Blackstone griddle?
Avocado oil and Blackstone’s own Seasoning & Cast Iron Conditioner are the top picks. Avocado oil has the highest smoke point (520°F) of common cooking oils, bonds reliably to the steel, and is easy to apply thinly with a paper towel. The Blackstone Conditioner is purpose-built for griddles and also works excellent. Canola and grapeseed oil are solid, affordable alternatives.
Can I use cooking spray (like PAM) to season my Blackstone?
No. Aerosol cooking sprays contain lecithin and other additives that don’t polymerize cleanly — they build up into a sticky, varnish-like layer that’s difficult to remove. Use a pourable oil and a paper towel instead.
Can I use olive oil to season my Blackstone?
Extra virgin olive oil has a low smoke point (around 375°F) and isn’t ideal for seasoning — it can create a weak, gummy layer. Regular refined olive oil works better but still falls short of avocado or canola. For initial seasoning especially, use an oil with a smoke point above 400°F.
Do you season the sides of a Blackstone griddle?
Yes. Apply oil to the sides and edges of the griddle top during every seasoning coat. Those areas are exposed to moisture and grease splatter during cooking and will rust if left bare.
How do you know when the oil has fully polymerized?
The smoking stops. When oil polymerizes on a hot griddle, it smokes as it undergoes the chemical reaction. Once the smoking slows and stops on its own — usually 15–20 minutes per coat — that coat is done. If you pull it off heat while it’s still actively smoking, the coat isn’t finished.
Can you over-season a Blackstone griddle?
You can apply too much oil in a single coat — that causes gummy buildup. But you can’t have “too many” properly applied thin coats. The seasoning improves with every correctly applied layer and every cook. More seasoning (done right) is always better.
Is it normal for my Blackstone to look black after seasoning?
Yes — dark brown to black with a slight sheen is exactly what you’re aiming for. It means the oil has polymerized and bonded to the steel. A silver or gray surface means it needs more seasoning. Uneven dark and light patches are normal early on and even out with regular use.
How often do I need to fully re-season my Blackstone?
With proper after-cook maintenance (a light oil coat every time), most people go years without needing a full re-season. You’ll know it’s time when food sticks consistently despite proper preheating, you see rust, or the surface looks visibly unprotected and dull. Good habits after each cook prevent the need for full re-seasons.
Should I season my Blackstone after every use?
Yes — the thin oil coat applied after cleaning is maintenance seasoning. It protects the surface from moisture and oxygen between cooks and gradually adds to your base seasoning. This is what separates a griddle that gets better over time from one that degrades.
What happens if I don’t season my Blackstone?
Food sticks, the surface rusts, and the griddle’s lifespan shortens dramatically. The rolled steel surface is porous and reactive — without a polymerized oil barrier, moisture reaches the metal and rust forms quickly. An unseasoned Blackstone in humid conditions can develop rust within days.
Can I season a Blackstone griddle in cold weather?
Yes, but it takes longer. Cold ambient temperatures mean the griddle takes more time to reach the temperature needed for oil to polymerize. Give it extra preheat time and expect each seasoning coat to take a few minutes longer to smoke off. The end result is the same.
How long after initial seasoning can I cook on my Blackstone?
You can cook on it immediately after the initial seasoning is complete and the griddle has cooled to a safe cooking temperature. There’s no cure time required — the seasoning is set once it’s cooled.
What’s the best way to store a Blackstone between uses?
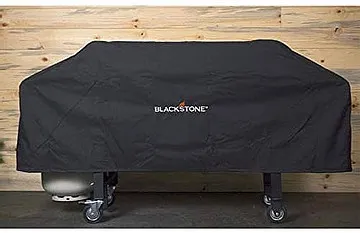
Apply a light oil coat after cleaning, let it cool completely, then cover with a fitted griddle cover. For outdoor storage, a hard cover provides better long-term rust protection than a soft fabric cover. In high-humidity environments, store with a silica gel packet under the cover to absorb excess moisture.
Blackstone Igniter Not Working? Fixes + How to Light It
Blackstone igniter not working — the dead battery fix that solves most, five more causes to check, and how to light the griddle manually.
Blackstone Not Getting Hot? 7 Fixes for Low Flame and Weak Heat
Why your Blackstone isn't getting hot — the regulator safety reset that fixes it 9 times out of 10, plus six other causes of low flame.
Blackstone Seasoning Sticky or Flaking? The Fix
Sticky, gummy, or flaking Blackstone seasoning — what causes each, the fix that doesn't require stripping, and when to fully re-season.